 Now our simplest webpart code is ready. In the earlier steps we have created a site collection under sharepoint. Next, we need to deploy the webpart which can be used by the site collection. In production scenario we can also do this by giving a strong name to the webpart assembly and deploy it to the GAC. However in this sample application, we can simply change the build path of class library and map it to the bin directory of the sharepoint web application. This way the sharepoint web application would get this webpart assembly directly.
Next step would be adding the assmbly as a safecontrol, since Sharepoint 3.0 would run those assemblies only which are marked as safecontrols. To add an assembly to safecontrols, we need to open web.config file of sharepoint web applicaiton.
Add an entry in the
Now our simplest webpart code is ready. In the earlier steps we have created a site collection under sharepoint. Next, we need to deploy the webpart which can be used by the site collection. In production scenario we can also do this by giving a strong name to the webpart assembly and deploy it to the GAC. However in this sample application, we can simply change the build path of class library and map it to the bin directory of the sharepoint web application. This way the sharepoint web application would get this webpart assembly directly.
Next step would be adding the assmbly as a safecontrol, since Sharepoint 3.0 would run those assemblies only which are marked as safecontrols. To add an assembly to safecontrols, we need to open web.config file of sharepoint web applicaiton.
Add an entry in the Tuesday, September 18, 2007
Build ASP.Net Webpart for Windows Sharepoint Services 3.0
Webpart, one of the few words many Sharepoint Experts throw towards a newbie. After you finish reading this article, you would have your own webpart created and deployed by following few simple steps.
One obvious question that would appear in your mind is what exactly is this webpart? In fact the answer is also known to you. Webparts are ASP.Net server controls. To create a new type of Web Part, you create an ASP.NET custom control. However, unlike standard ASP.NET controls, which are added to Web form pages by programmers at design time, Web Parts are intended to be added to Web Part Zones on Web Part Pages by users at run time. Webparts helps application designers, developers and users satisfying each of them. You can very easily get more information about these webparts and how to effectively use them in your sharepoint sites. However this article would try to explain to build an ASP.Net 2.0 Webpart for WSS 3.0.
We would start up by creating a sharepoint web application in WSS 3.0. To create a sharepoint web application, you would need to start from Sharepoint Central Administration site from Administrative tools (Assumption: WSS 3.0 installed on Windows Server 2003).
To create a sharepoint webapplication go to Application Management. Follow Create a new web application link. You can either create a new IIS site or use an existing IIS site as a base for new web application. On the create application page, fill up all the required information and move ahead. Once the application is created we would have to create a new site collection, in order to place our new webpart. You create a site collection with Blank site template, since we would be just doing the test.
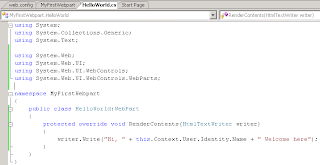
Now we need to move to visual studio for creation of webpart. In Visual Studio 2005, create a new class library and name it as "MyFirstWebpart". In order to use existing infrastructure, you would need few namespaces in your webpart code.
System.Web
System.Web.UI
System.Web.UI.WebControls
System.Web.UI.WebControls.Webpart
The built-in webpart class would be inherited by our webpart. The Webpart class was introduced in asp.net 2.0 along with other webpart infrastructure code. Under this class we would override RenderContents method which would give us access to simple HTML writer. Under the method we would get access to context as well. The code should look like following.
 Now our simplest webpart code is ready. In the earlier steps we have created a site collection under sharepoint. Next, we need to deploy the webpart which can be used by the site collection. In production scenario we can also do this by giving a strong name to the webpart assembly and deploy it to the GAC. However in this sample application, we can simply change the build path of class library and map it to the bin directory of the sharepoint web application. This way the sharepoint web application would get this webpart assembly directly.
Next step would be adding the assmbly as a safecontrol, since Sharepoint 3.0 would run those assemblies only which are marked as safecontrols. To add an assembly to safecontrols, we need to open web.config file of sharepoint web applicaiton.
Add an entry in the
Now our simplest webpart code is ready. In the earlier steps we have created a site collection under sharepoint. Next, we need to deploy the webpart which can be used by the site collection. In production scenario we can also do this by giving a strong name to the webpart assembly and deploy it to the GAC. However in this sample application, we can simply change the build path of class library and map it to the bin directory of the sharepoint web application. This way the sharepoint web application would get this webpart assembly directly.
Next step would be adding the assmbly as a safecontrol, since Sharepoint 3.0 would run those assemblies only which are marked as safecontrols. To add an assembly to safecontrols, we need to open web.config file of sharepoint web applicaiton.
Add an entry in the area as follows
Now our simplest webpart code is ready. In the earlier steps we have created a site collection under sharepoint. Next, we need to deploy the webpart which can be used by the site collection. In production scenario we can also do this by giving a strong name to the webpart assembly and deploy it to the GAC. However in this sample application, we can simply change the build path of class library and map it to the bin directory of the sharepoint web application. This way the sharepoint web application would get this webpart assembly directly.
Next step would be adding the assmbly as a safecontrol, since Sharepoint 3.0 would run those assemblies only which are marked as safecontrols. To add an assembly to safecontrols, we need to open web.config file of sharepoint web applicaiton.
Add an entry in the
Subscribe to:
Post Comments (Atom)
No comments:
Post a Comment
Thank you for your feedback. I will be glad to know, if this post helped you.