Monday, January 21, 2008
SPBasePermission
While my friends were having fun during weekends, I was hitting my head against an issue in my application. It took me a very long time to understand and resolve the issue. But finally all well that ends well.
Here is the issue.
I use Visual Studio for creating a subsite under a site collection. The users are present in the site collection under "Read" role. I use impersonation to create the subsite. After creation of site, I create RoleDefinition and the RoleAssigment so that the users have all appropriate rights on the newly created subsite.
I was properly breaking inheritance by using
web.RoleDefinitions.BreakInheritance(false,false);
The above statment was written to ensure that the "Read" role permissions are not carried over to subsite, instead subsite should use their unique permission level and unique role definition.
The problem was, after creation of subsite the subsite was not accessible to the users in the specified group.
Inspite of all above written measures, I was not sure what is causing this error. After trying lots of things finally I got the solution. The solution was simple as to have following permissions applied to the RoleDefinition at the time of creation
SPBasePermissions.ViewListItems
SPBasePermissions.AddListItems
SPBasePermissions.EditListItems
SPBasePermissions.DeleteListItems
SPBasePermissions.OpenItems
SPBasePermissions.ViewVersions
SPBasePermissions.DeleteVersions
SPBasePermissions.ViewFormPages
SPBasePermissions.Open
SPBasePermissions.ViewPages
SPBasePermissions.BrowseDirectories
SPBasePermissions.BrowseUserInfo
SPBasePermissions.UseClientIntegration
SPBasePermissions.UseRemoteAPIs
SPBasePermissions.CreateAlerts
SPBasePermissions.EditMyUserInfo;
That resolved my issue.
If anybody has same or similar issue, let me know. I would be happy to assist.
Thanks,
Subhash

Sunday, January 20, 2008
Remember this while upgrading from WSS 2.0 to WSS3.0
In this article we would try to figure out few small things which you must remember before/during an In-place upgrade from WSS 2.0 to WSS 3.0.
1. Connection strings/ connection string information:
If you have a custom application running under a sharepoint site, make sure that you do not have connection string like "Data Source=(local);Initial Catalog = MyDB;....." etc. This is because the upgrade might fail because of the word (local). Same is applicable to your settings in Sharepoint Central Administration. Make sure that Content/configuration Database server name is not (local) or . Even if you are using local server as database server, make sure you give Full Name.
2. Prescan-tool: After the last step of Installation of WSS 3.0, the installation wizard have one check-box for executing Sharepoint Technology Configuration Wizard. This check-box is checked by default. However the upgrade would fail if you continue as is. Ensure that you have executed Pre-scan tool before execution Sharepoint Technology and configuration wizard. The prescan tool exists under programfiles/Microsoft Shared/Web server extension/12/bin directory.
3. Rights: Make sure that the service accounts are set properly and that these accounts have all required access to all servers and to the database.
In the unfortunate even of upgrade failure, don't worry. Just visit upgrade log available under programfiles/Microsoft Shared/Web server extension/12/logs. Understand the exception and act accordingly. Though wizard states that the process is irriversible, you can always correct the issues and execute the wizard again. In most of the cases, the upgrade fails because of few obvious reaons.
Enjoy !!
Subhash
Saturday, January 12, 2008
System policies must have full control !!
I have been trying hard with a problem with the search service.
Here is the problem definition.
While using Windows Sharepoint Services 3.0 Search Service, when you try to start the search service instance on webserver, it throws error "System policies must have full control".
And this is the solution that worked for me:
I digged into all kind of books, technical references. There may be several different reasons behind this error and solutions defer from situation to situation. But the in my case problem was with the Service Account and Content Access account. I was trying to start the search service using credentials of Farm Administator. However it has been explicity mentioned on Microsoft Techcenter, that the content access account and service account MUST NOT BE farm administrator. I got this reference from here: http://technet2.microsoft.com/Office/en-us/library/f07768d4-ca37-447a-a056-1a67d93ef5401033.mspx?mfr=true .
I just created a seperate domain account and used that as service & content access account. That's it!!! The search service started working very smoothly.
Hope this helps you. Happy programming :-)
[Please note: This solution/comment is based on personal experience and may not be authentic. This solution does not guarantee that it would react the same way anywhere else. You can refer to product documentation and authorized websites for more information.]
Tuesday, September 18, 2007
Build ASP.Net Webpart for Windows Sharepoint Services 3.0
Webpart, one of the few words many Sharepoint Experts throw towards a newbie. After you finish reading this article, you would have your own webpart created and deployed by following few simple steps.
One obvious question that would appear in your mind is what exactly is this webpart? In fact the answer is also known to you. Webparts are ASP.Net server controls. To create a new type of Web Part, you create an ASP.NET custom control. However, unlike standard ASP.NET controls, which are added to Web form pages by programmers at design time, Web Parts are intended to be added to Web Part Zones on Web Part Pages by users at run time. Webparts helps application designers, developers and users satisfying each of them. You can very easily get more information about these webparts and how to effectively use them in your sharepoint sites. However this article would try to explain to build an ASP.Net 2.0 Webpart for WSS 3.0.
We would start up by creating a sharepoint web application in WSS 3.0. To create a sharepoint web application, you would need to start from Sharepoint Central Administration site from Administrative tools (Assumption: WSS 3.0 installed on Windows Server 2003).
To create a sharepoint webapplication go to Application Management. Follow Create a new web application link. You can either create a new IIS site or use an existing IIS site as a base for new web application. On the create application page, fill up all the required information and move ahead. Once the application is created we would have to create a new site collection, in order to place our new webpart. You create a site collection with Blank site template, since we would be just doing the test.
Now we need to move to visual studio for creation of webpart. In Visual Studio 2005, create a new class library and name it as "MyFirstWebpart". In order to use existing infrastructure, you would need few namespaces in your webpart code.
System.Web
System.Web.UI
System.Web.UI.WebControls
System.Web.UI.WebControls.Webpart
The built-in webpart class would be inherited by our webpart. The Webpart class was introduced in asp.net 2.0 along with other webpart infrastructure code. Under this class we would override RenderContents method which would give us access to simple HTML writer. Under the method we would get access to context as well. The code should look like following.
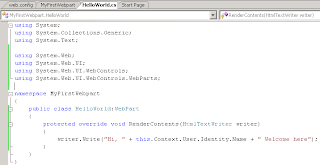 Now our simplest webpart code is ready. In the earlier steps we have created a site collection under sharepoint. Next, we need to deploy the webpart which can be used by the site collection. In production scenario we can also do this by giving a strong name to the webpart assembly and deploy it to the GAC. However in this sample application, we can simply change the build path of class library and map it to the bin directory of the sharepoint web application. This way the sharepoint web application would get this webpart assembly directly.
Next step would be adding the assmbly as a safecontrol, since Sharepoint 3.0 would run those assemblies only which are marked as safecontrols. To add an assembly to safecontrols, we need to open web.config file of sharepoint web applicaiton.
Add an entry in the
Now our simplest webpart code is ready. In the earlier steps we have created a site collection under sharepoint. Next, we need to deploy the webpart which can be used by the site collection. In production scenario we can also do this by giving a strong name to the webpart assembly and deploy it to the GAC. However in this sample application, we can simply change the build path of class library and map it to the bin directory of the sharepoint web application. This way the sharepoint web application would get this webpart assembly directly.
Next step would be adding the assmbly as a safecontrol, since Sharepoint 3.0 would run those assemblies only which are marked as safecontrols. To add an assembly to safecontrols, we need to open web.config file of sharepoint web applicaiton.
Add an entry in the area as follows
 Now our simplest webpart code is ready. In the earlier steps we have created a site collection under sharepoint. Next, we need to deploy the webpart which can be used by the site collection. In production scenario we can also do this by giving a strong name to the webpart assembly and deploy it to the GAC. However in this sample application, we can simply change the build path of class library and map it to the bin directory of the sharepoint web application. This way the sharepoint web application would get this webpart assembly directly.
Next step would be adding the assmbly as a safecontrol, since Sharepoint 3.0 would run those assemblies only which are marked as safecontrols. To add an assembly to safecontrols, we need to open web.config file of sharepoint web applicaiton.
Add an entry in the
Now our simplest webpart code is ready. In the earlier steps we have created a site collection under sharepoint. Next, we need to deploy the webpart which can be used by the site collection. In production scenario we can also do this by giving a strong name to the webpart assembly and deploy it to the GAC. However in this sample application, we can simply change the build path of class library and map it to the bin directory of the sharepoint web application. This way the sharepoint web application would get this webpart assembly directly.
Next step would be adding the assmbly as a safecontrol, since Sharepoint 3.0 would run those assemblies only which are marked as safecontrols. To add an assembly to safecontrols, we need to open web.config file of sharepoint web applicaiton.
Add an entry in the
Subscribe to:
Posts (Atom)